In this post, I will demonstrate how GitHub Actions can be used to automate the process of publishing gems whenever a new version is created.
We will cover the following topics:
- Creating and publishing gems
- Introduction to GitHub Actions
- Gem versioning and changelog management
- Setting up GitHub Actions for gem publishing
- Automating the publishing process through tag creation
Creating and Publishing Gems
In Ruby, code libraries are called gems. They can be found and installed from a public repository called RubyGems, which is the main hosting and management service for gems in the Ruby community.
To create a new gem, you can use the bundle gem command, which is provided by the bundler gem.
$ bundle gem my_gemThis command will generate the necessary files and directories for the gem.
my_gem
├── Gemfile
├── README.md
├── Rakefile
├── lib
│   ├── my_gem
│   │   └── version.rb
│   └── my_gem.rb
├── my_gem.gemspec
└── spec
    ├── my_gem_spec.rb
    └── spec_helper.rb
Once the gem is ready, you can build it using the gem build command, which will create a .gem file that can be published to RubyGems.
$ gem build my_gem.gemspecAfter building the gem, you can publish it to RubyGems using the gem push command.
$ gem push my_gem-0.1.0.gemPS: You need to have a RubyGems account and be authenticated to publish gems.
GitHub Actions
Similar to other CI/CD tools, GitHub Actions allows you to automate tasks like testing, linting, and deployments. The configuration is done through YAML files that define which processes will be executed based on specific events, such as a commit to a particular branch.
The example below shows a simple GitHub Actions workflow that will run the tests for a Ruby application whenever a new commit is pushed to the main branch:
name: RSpec tests

on:
  push:
    branches:
      - main

jobs:
  test:
    runs-on: ubuntu-latest

    steps:
    - name: Checkout code
      uses: actions/checkout@v2

    - name: Set up Ruby
      uses: actions/setup-ruby@v1
      with:
        ruby-version: '3.4'

    - name: Install dependencies
      run: bundle install

    - name: Run tests
      run: bundle exec rspec
Gem versioning and changelog management
When we are satisfied with the gem code and want to release a new version, we need to follow some practices to ensure that the gem is correctly versioned and documented.
Let’s use the lean-microsoft-graph gem as an example, where a new feature was added and some dependencies were updated in this Pull Request.
After merging the code, we can create a new Pull Request changing the version number and updating the CHANGELOG.md file.
Before proceding, it is important to mention the Semantic Versioning guidelines, that follows the format MAJOR.MINOR.PATCH.
The version number is incremented based on the type of changes made:
- Major: for incompatible API changes
- Minor: for new functionality in a backwards-compatible manner
- Patch: for backwards-compatible bug fixes
The version file is located at lib/lean/microsoft/graph/version.rb. Since a new feature was added without breaking changes, we will increment the minor version to 3. So the new version will be 0.3.4.
module LeanMicrosoftGraph
  VERSION = "0.3.4"
end
Now we need to update the CHANGELOG.md file with the changes made in the new version.
# Changelog

<!-- Additional logs omitted for brevity. -->

## [0.3.4] - 2024-08-30

### Added

- Ability to retrieve users by id with `client.users.get_by_id('id')`.

### Changed

- Upgrade dependencies: faraday, mocha and minitest.

<!-- Additional logs omitted for brevity. -->

[0.3.4]: https://github.com/betogrun/lean-microsoft-graph/releases/tag/v0.3.4
Please, take a look at the Keep a Changelog website for more information on how to document the changes in the CHANGELOG.md file.
At this point, we could build and publish the gem manually, but we want to automate this process using GitHub Actions.
Setting up GitHub Actions for gem publishing
To automate the process, we need to create a GitHub Workflow, which is a YAML file located in the .github/workflows directory. If it doesn’t already exist, we can create it manually or use GitHub to generate an initial file. In the case of the lean-microsoft-graph gem, there was already a ruby.yml file responsible for running unit tests, as seen in this Pull Request.
Github actions will need an authentication token to publish the gem to RubyGems. This token should be stored in the repository secrets and passed to the workflow as an environment variable. The token can be obtained from RubyGems website.
Follow these steps to add the token to the repository secrets:
- Go to
Settingsin the repository. - Navigate to
Secrets and variablesand click onActions. - Click on
New repository secret. - Name the secret RUBYGEMS_AUTH_TOKEN, paste the obtained token, and click
Add Secret.
Now we need to add a new job to the existing YAML file to handle the steps required to publish the gem. We could also handle the publication process in a separate workflow file, but in this case, we will add it to the existing file.
Let’s add a new job called publish to the existing YAML file:
jobs:
  publish:
    needs: test
    runs-on: ubuntu-latest
    if: startsWith(github.ref, 'refs/tags/v')
In the example above, we:
- Added the
needskeyword to specify that the publish job should wait for the test job to complete successfully before running. This creates a dependency that ensures the tests are executed first. - Specified the environment where the job will run. In this example, the job runs on the latest version of Ubuntu.
- Included a condition to the job to ensure that it only runs when a new tag starting with
vis created, indicating a version release.
Now, we need to define the step to set up the environment. In this example, we set up Ruby and define the Ruby version to use:
  steps:
    - uses: actions/checkout@v3  # Check out the repository code

    - name: Set up Ruby
      uses: ruby/setup-ruby@v1
      with:
        ruby-version: '3.4'  # Specify the Ruby version to use
Lastly, we need to add the step to build and publish the gem.
First, we create the .gem directory and the credentials file. Then, we set the permissions for the file and write the authentication token to it.
    - name: Publish to RubyGems
      run: |
        mkdir -p $HOME/.gem
        touch $HOME/.gem/credentials
        chmod 0600 $HOME/.gem/credentials
        printf -- "---\n:rubygems_api_key: ${GEM_HOST_API_KEY}\n" > $HOME/.gem/credentials
Then we build the gem and push it to RubyGems:
        gem build *.gemspec
        gem push *.gem
We can’t forget to use the env keyword to pass the RubyGems authentication token from the repository secrets:
      env:
        GEM_HOST_API_KEY: ${{ secrets.RUBYGEMS_AUTH_TOKEN  }}
The complete job for publishing the gem should look like this:
publish:
    needs: test
    runs-on: ubuntu-latest
    if: startsWith(github.ref, 'refs/tags/v')
    steps:
      - uses: actions/checkout@v3
      - name: Set up Ruby
        uses: ruby/setup-ruby@v1
        with:
          ruby-version: '3.0'
      - name: Publish to RubyGems
        run: |
          mkdir -p $HOME/.gem
          touch $HOME/.gem/credentials
          chmod 0600 $HOME/.gem/credentials
          printf -- "---\n:rubygems_api_key: ${GEM_HOST_API_KEY}\n" > $HOME/.gem/credentials
          gem build *.gemspec
          gem push *.gem
        env:
          GEM_HOST_API_KEY: ${{ secrets.RUBYGEMS_AUTH_TOKEN  }}
Automating the publishing process through tag creation
Finally, after merging the Pull Request that updates the gem version and the changelog, the next step is to create a new tag for the new version by running the following command:
$ git tag -a v0.3.4 -m "Version 0.3.4"The -a flag creates an annotated tag, and the -m flag adds a message to the tag. Both are optional.
After that, we need to push the tag to the remote repository on GitHub:
$ git push origin v0.3.4After pushing the tag, the GitHub Actions workflow will be triggered, and the gem will be built and published to RubyGems.
The result of the workflow can be checked in the Actions tab of the repository.
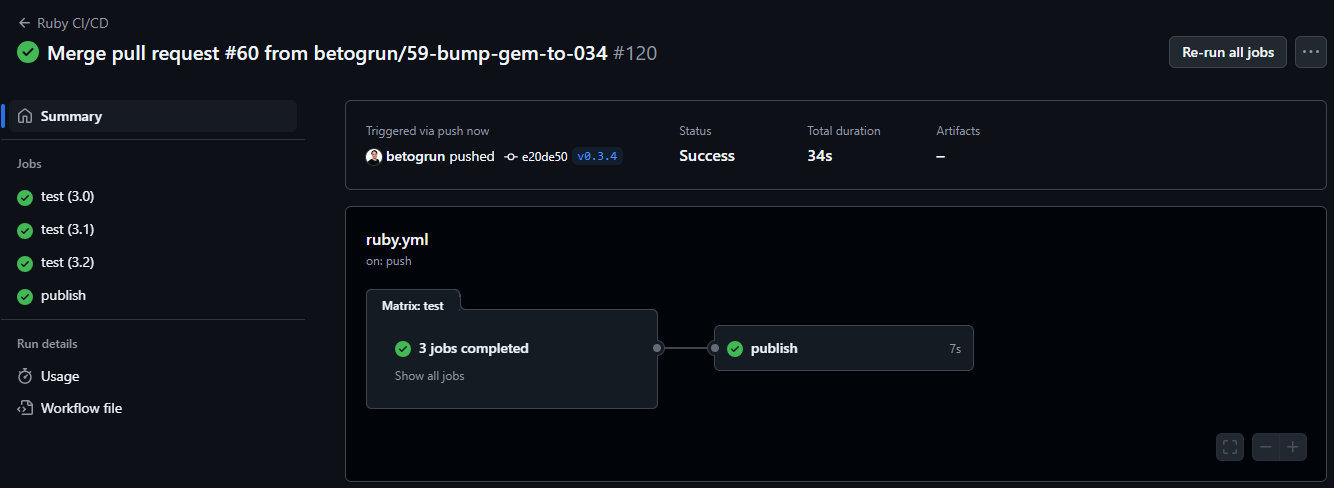
The new version of the gem will be available on RubyGems, and the changes will be reflected in the gem page.
Conclusion
This post demonstrated how to automate the process of publishing Ruby gems using GitHub Actions, and also covered the best practices for versioning and changelog management.
Please fell free to share how you are using GitHub Actions to automate your workflows and your favorite approaches to gem versioning and publishing.